OVERVIEW
This is a PHPMaker project file that will show you how to create a PHP web application that will insert a new record into a similar table in another database, when a new record is inserted into the current database. In other words, this project uses two different database connection. The additional database connection is handled by a Linked Tables feature in PHPMaker project.
For simplicity, then the tables schema are the same between the main database connection and the additional linked table database connection. You can try this project by yourself in your computer. You will learn some important things about how to implement Linked Tables by using the Row_Inserted server event from your PHPMaker project.
WHY SHOULD I USE THIS PROJECT?
By using this PHPMaker project, then you will learn:
1. How to setup another database connection using Linked Tables feature, besides using the existing main database connection.
2. How to write a simple PHP code that will execute the INSERT INTO SQL to another table, by using Row_Inserted server event.
3. How to use another database connection from Linked Tables, and implementing it via ew_Execute() global function.
4. How to re-synchronize a PHPMaker project file without having to lose all the customization/settings in the current project.
5. How to create and generate a web application within only a few minutes.
VERSION SUPPORTED
Minimum version: PHPMaker 2018.
CHANGE LOG
Initially created on May 8, 2018 by using PHPMaker 2018.
EXTENSIONS
The only extension is used by this project is DateTimePicker. This extension is shipped with PHPMaker built-in. You can simply enable it from: Tools -> Extensions -> Type: Date/Time Picker.
PROJECT PREPARATION
1. Create two databases: codecanyon_linked1 and codecanyon_linked2 respectively.
2. Run the codecanyon_linked1.sql script inside codecanyon_linked1 database, in order to create a new table named table1.
3. Run the codecanyon_linked2.sql script inside codecanyon_linked2 database, in order to create a new table named table2.
4. Run the codecanyon_linkedtables.pmp by using PHPMaker application.
5. Change the connection info in the Database tab, then click Tools -> Synchronize, to update the main database connection info.
6. Click on top menu: Edit -> Add Linked Tables, select codecanyon_linked2 (var: codecanyon_linked2, type: MySQL) from the Database selection list (error may occur because the username and password are incorrect, ignore it).
7. Click on the Synchronize database button to display Database Connection dialog window in order to change the database info, change the connection info, and then click on Synchronize button to synchronize the new setting and close the form.
8. Click on the Generate tab, change the destination folder to where you want to output the generated files from Application root folder and Destination folder respectively.
9. If you use your own PC as a testing server, setup your testing web server (read Generate Settings -> Testing web server in the help file), check Browse after generation if you want PHPMaker to open your browser after generation,
10. Click on the Generate button and wait until all the files are generated,
11. When script generation is finished, upload the files to your testing server if necessary.
12. Browse the website.
PROJECT CUSTOMIZATION
1. Make sure you have already run/open the codecanyon_linkedtables.pmp file by using PHPMaker application.
2. Click on table1 from Database pane at the left side of your PHPMaker project.
3. Click on Code (Server Events, Client Scripts and Custom Templates) tab.
4. Go to this location: Server Events -> Table-Specific -> Common, and see the code in Row_Inserted section.
TRY THE GENERATED WEB APPLICATION
1. Run the generated web application from your favorite browser.
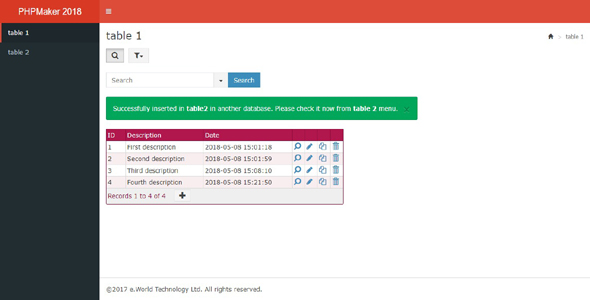
2. Make sure you have already selected table 1 menu.
3. Click on (Add) button to open the Add form page.
4. In the table 1 Add form page, fill in the Description and Date fields.
5. Click on Add button to save that new record, and make sure the insertion process is successfully.
6. Check that new record in table 2, by clicking on the table 2 menu item.
7. Make sure that new record is already exists in the table 2.